Installation as transport
IMPORTANT NOTE:
Before you install the transport make sure that neither the ZAUDICZ package nor the ZAUDICZ function group already exists in your system.
If one of these objects exists and the function group ZAUDICZ contains other objects than the function module ZAUDICZ-RFC_READ_TABLE, follow the steps described below to install via source code. Also choose different names for the package and the function group to prevent existing objects in the customer name space from being overwritten.
The directory ZAUDICZ_RFC_READ_TABLE/Transport on the SAP® Components CD contains the following files (where xxxxx is the number of the transport request and YYY represents the delivery system):
- K9xxxxx.YYY
- R9xxxxx.YYY
The K9xxxxx.YYY file is the R3Trans Command file. The R9xxxxx.YYY file is the corresponding Data file. Data and Command file have to be transferred to the central transport directory of your destination system. (When using an FTP, please make sure to transfer the data in binary mode.)
Copy the K9xxxxx.YYY Command file to the /sapmnt/trans/cofiles directory and the R9xxxxx.YYY Data file to the /sapmnt/trans/data directory.
The specified paths for the transport directory /sapmnt/trans serve as an example and can be defined differently in your system (e.g. /usr/sap/trans) and have to be changed accordingly.
IMPORTANT NOTE:
File names have to remain upper case after their transfer. Please make sure that the file names are still upper case. You also have to remove the read-only attribute!
The import of the requests can be started by using the corresponding TMS functions.
- Call the STMS transaction.
- Select Import Overview
 .
. - Select the SAP® system for which you want to import the requests.
- Select Import Queue Display
 .
. -
In the Extras menu select the Other requests – Add function.

Figure: Importing transport request
-
Select the transport request which you have copied in the previous step and confirm that you want to add the transport request.
The request will be shown in the import queue.
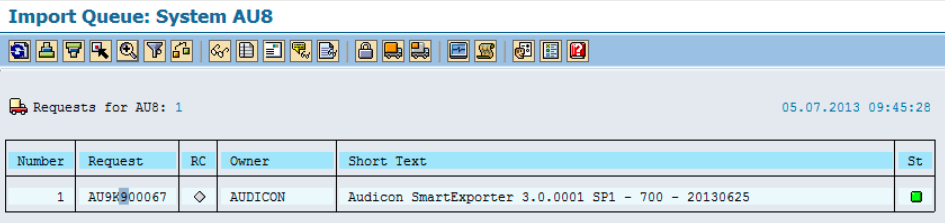
Figure: Import Queue
- Select the imported request by highlighting it and click the Select Request +/-
 icon.
icon. -
Click the Import Request
 icon to import the request.
The transport does not contain any client specific data and can be imported in any client in the following step.
Due to the small size of the request you can import it by using the time setting Immediate and the execution setting Synchronous.
Please adjust the options according to your target system.
- Click Next
 to start the import.
 -
Confirm your entries by clicking Yes.
Depending on the settings the import will now be run synchronously in the dialog or asynchronously in the background.
-
Click the Logs
 icon to show the transport log of the request.
You can ignore the "(4) Ended with Warning" messages for the import steps Import ABAP Dictionary Objects and ABAP Dictionary Activation.

Figure: Transport Logs